

Key takeaways
- A manual ice shaver or crusher that is clean and dry.
- Ice that is frozen solid, in a size that fits the feed.
- A chilled bowl or cup to catch shavings.
- Syrups or toppings ready to go.
- A towel for wet hands and condensation.
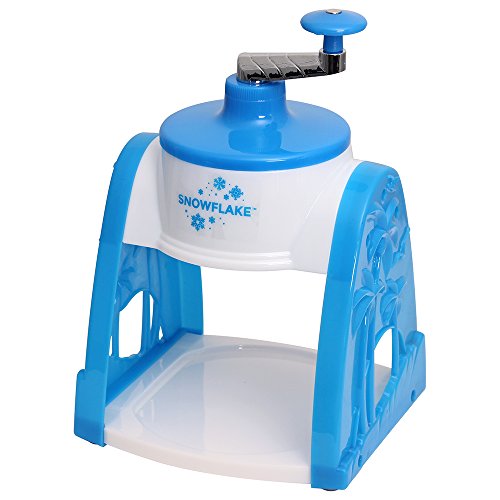
To use a manual ice shaver well, start with hard, clear ice, let it rest a minute so it does not stick, secure the shaver to a stable surface, and turn the handle in smooth, steady strokes. Most disappointing results come from the ice, not the tool, so this guide begins there and finishes with cleanup and the handful of accessories that make the process easier.
What You Need Before You Start
- A manual ice shaver or crusher that is clean and dry.
- Ice that is frozen solid, in a size that fits the feed.
- A chilled bowl or cup to catch shavings.
- Syrups or toppings ready to go.
- A towel for wet hands and condensation.
| Item | Best for | Key feature |
|---|---|---|
| Rubbermaid Brilliance Food Storage Container | Freezing dense ice blocks | Clear, leak-resistant, stackable body |
| Cuisinart Stainless Steel Mixing Bowl Set | Catching and chilling shavings | Metal bowls that stay cold |
| OXO Good Grips Squeeze Bottle | Controlled syrup pouring | Easy-grip body with a fine tip |
| Igloo Cooler | Parties and picnics | Keeps blocks frozen away from the freezer |
Step 1: Make Better Ice
Manual shavers are less forgiving than electric ones, because you supply the force. Cloudy, air-filled ice breaks unpredictably, while dense ice cuts cleanly. To make denser blocks, fill a container with cold water and freeze it slowly. Many people use a container like the Rubbermaid Brilliance food storage container because it is clear, stackable and easy to release ice from. Fill it to a depth that matches your shaver’s opening, and leave the lid off for most of the freeze so it does not trap air against the surface. Check that the finished block is not wider than the hopper.
Step 2: Let the Ice Temper
Ice straight from a very cold freezer is brittle and can chip rather than shave. Leave it on the counter for a few minutes until the surface looks slightly wet. This tempering step is small, but it is the difference between smooth ribbons and chunky shards. If it starts to drip, it has gone too far, so put it back for a moment.
Step 3: Stabilize the Shaver
A manual tool that moves while you crank wastes your effort and can slip. Clamp it to a table if it is designed for that, or place it on a damp towel or non-slip mat. Put a chilled bowl under the outlet. A metal bowl such as one from a Cuisinart stainless steel mixing bowl set keeps the shavings from melting immediately, and the set lets you rotate bowls during a party.
Step 4: Crank Smoothly
Hold the ice gently against the blade or feed it through the hopper, and turn the handle with a steady rhythm. Do not jam or force it. If the handle becomes hard to turn, stop, check that the ice is the right size and let it temper a little longer. Small amounts at a time give a more consistent texture. Keep your free hand away from the blade and opening.
Step 5: Pack, Flavor and Serve
Gently pack shavings into a cup, because hard packing squeezes out air and turns the ice into a block. Pour syrup slowly in a spiral, letting it work down. A squeeze bottle such as the OXO Good Grips squeeze bottle makes that easier than pouring from a large syrup jug. Serve immediately, because shaved ice melts fast.
Step 6: Keep It Cold at Gatherings
If you are shaving ice for guests outdoors, store your blocks in a cooler until needed. An insulated cooler like an Igloo cooler helps keep the ice frozen for the whole event, and you can keep syrups cold alongside. Do not store shavings in advance; shave in small batches.
Troubleshooting
The ice is jamming
The ice is likely too wet, too large or the blade is dull. Temper it, trim it, or change the blade.
The shavings are chunky
Slow down, use drier ice and check the blade adjustment if your model allows it.
The handle is hard to turn
Do not force it. Check for lodged ice, and lubricate gears only with food-safe lubricant if the manual permits.
Syrup sinks straight through
That happens with coarse ice. Pack lightly, use thicker syrup, or serve with a spoon straw so you can stir.
Cleaning and Storage
Rinse the shaver with warm water after use, paying attention to sugar residue. Dry every part, especially metal, and wipe the blade carefully. Store it in a dry place, and wipe a light coat of food-safe mineral oil on exposed iron parts if you do not use it often. Never leave syrup to harden inside the mechanism.
Fifth Helper: Stackable Serving Cups
Once the ice is shaved, serving speed matters, because shavings begin to collapse within minutes. Reusable cups that stack neatly and can sit in a freezer ahead of time help a lot. A set such as the YETI Rambler stackable cups can be pre-chilled and kept cold, which slows melting noticeably while people eat. They are sturdier than paper, which makes them handy for adults who want to linger over dessert, though they cost more than disposables and do not suit large crowds where you will not get cups back.
Matching Technique to Ice Type
Different ice types call for slightly different handling. Block ice made in a container is the most forgiving, because it is dense and uniform. Cubes from a tray are a step down: they can be cloudy and may contain air pockets that shatter unpredictably. Crescent-shaped dispenser ice is the most awkward, since the curved shapes do not sit flat against a blade. If your shaver is designed for cubes, use them straight from the freezer after a brief rest. If it is designed for blocks, resist the temptation to jam in cubes, because the feed may not hold them steadily.
Also think about how you hold the ice. With open-style shavers, a firm, flat grip against the blade gives consistent thickness, while a loose, tilting grip produces uneven flakes. With hopper-style crushers, fill the hopper only part way so the ice can fall and turn. Keep the crank speed constant; speeding up and slowing down changes the texture from strand to strand and tires your wrist.
When the first cup comes out less than perfect, do not give up. Change one variable at a time: rest the ice a bit longer, use a fresher block, or slow the crank. Most people reach a consistent result within a few attempts, and the satisfaction of making cold, sweet shaved ice without plugging anything in is a good part of the appeal.
Common Mistakes
- Shaving ice straight from a deep freeze without tempering it.
- Using cloudy, bubbly ice from a tray.
- Not securing the base, which makes cranking inefficient.
- Packing the cup too hard.
- Putting wet metal parts away.
Frequently Asked Questions
How long does it take to freeze a good block?
Plan on several hours or overnight, depending on the container and freezer. Larger blocks need longer.
Can I use ice cubes from a refrigerator dispenser?
You can for crushers, but expect rougher texture. Dispenser ice is often small and cloudy.
Why does my shaved ice melt so quickly?
Warm cups, warm syrups and tempering too long all speed melting. Chill everything and serve fast.
Is a manual shaver tiring?
For a few cups, no. For a crowd, it can be, so share the cranking duty.
Conclusion
A manual shaver rewards patience: dense ice, a short rest, a stable base and an even crank give surprisingly good results. Add a few inexpensive supporting tools and you will get more out of the same shaver.
As an Amazon Associate we earn from qualifying purchases.
More from Amazon
Programs that pair well with the guide above. Offers and eligibility are set by Amazon and may change.
Set up recurring deliveries of everyday items on eligible products. Terms and savings are set by Amazon.
Explore Subscribe & SaveCollect the home and kitchen items you want in one registry that guests can shop from.
Create a wedding registryFree shipping on eligible items, Prime Video and more. Eligible new members can start with a free trial.
Start a Prime free trialAudiobooks and podcasts to listen to on the go. Eligible new members can start with a free trial.
Try Audible freeAs an Amazon Associate we earn from qualifying purchases.


Write Your Review
No reviews yet. Be the first to share your experience!